Ooey Gooey Lemon Kefir Bars

These bars will be loved by all, they are not super strong in lemon flavor and the richness of the Kefir “cheesecake” like topping with the texture of the course cake crumble made with oat flour is superb! We made our own powdered sugar as we had none! This seems to happen so in my research I realized powdered sugar is just sugar with cornstarch. Now you can have a back up plan- Simply add 1 TBSP Cornstarch or Arrowroot powder to 1 C granulated sugar, pulse in blender until powdered. Worked really well in this recipe and I will use in many more to come. I love Arrow root for many uses, including thickening creamy pasta sauces or soups. 

I used the Kefir cheese in place of cream cheese for the texture, and oat Flour with whey protein to add nutrition to these very sweet bars. You could however use regular flour or flour substitute and I believe they would come out great. I hope you enjoy as much as our family. Use Meyer Lemons if you can it makes all the difference.

Lemon Kefir Bars  Servings 64   

Ingredients:

  • Cake Crust;img_1993
    • 5 Cups Flour
    • 1 1/2 C Sugar
    • 6 tbsp Baking Powder
    • 2 tsp Salt
    • 1/2 C Melted Butter
    • 2 eggs
  • Topping;
    • 3 1/2 C Powdered Sugar
    • 16 oz Kefir Cheese
    • 5 eggs

Directions:

  1. Preheat oven to 350 F. Grease 1 9 x 13″ pan and one 8 x 8 ” pan.  Mix flour, baking powder, sugar, salt, melted butter and eggs in large bowl until crumbly.Press into bottom of greased pan, making sure to keep areas as even as possible.


  2. Place kefir cheese and sugar in mixing bowl. Mix in 1 egg at a time until well beaten. Pour mixture over cake crust. Mixture will be runny this is ok! Place in oven and bake until golden brown on edges around 55 minutes. Middle will be soft but does not need to be firm.

    Let cool before cutting into small squares. Enjoy!


Dairy Man’s Dream; No-Rise, No- Knead, Quick Parmesan Bread

img_3785Why is this bread called “Dairy Man’s Dream”? It has cheese, yogurt, milk, and butter! I adapted this recipe from “Bread Illustrated” written by the editors of America’s Test Kitchen. I have loved this book, all the recipes have great step by step illustrations. Bread is intimidating for me and this book really helps me understand the process of making bread so I can, well, actually make bread! In fact this recipe was done with my 2 year old!

I tried this recipe out last night, we did not have bread for dinner and the kids were up to make something. I almost pulled our bread machine out, (the kids call him “crunchy robot”) but I put him back and flipped through the cook book instead. I love the idea of no knead quick bread you can literally make in 10 minutes pop in oven and serve! The recipe called for sour cream and I substituted my farm fresh yogurt instead. I also omitted the cheddar cheese and added extra parm. The results were impressive and my dairy man of a husband happy after another long day at the new barn.

Ingredients:                                                                                                   

  • 2 1/2 C All Purpose Flour img_3790
  • 1 Tbsp Baking Powder
  • 2 Tsp Salt
  • 3 Tsp Fresh Ground Black Pepper
  • 3/4 C Yogurt
  • 3 Tbsp Melted Butter
  • 2 Cups Shredded Parmesan Cheese

Directions: Pre heat oven to 350 F. Melt Butter over low heat. Whisk in milk, salt and yogurt. Set aside.

Mix flour baking soda, pepper and 1 C of the cheese. Butter a 8″ x 4″ pan and sprinkle 1/2 C Parmesan cheese on bottom. Fold wet ingredients into dry, until just incorporated. Do not over mix!

Dough will be very heavy and lumpy. Place in prepared bread pan and smooth top. Sprinkle with remaining cheese and bake approx 45 minutes until golden brown! Let cool at least 30 minutes, slice and serve with more butter of course!

img_3730

The kids helping at the new barn

Maple Yogurt Almond Muffins

The ultimate muffin light wholesome with hidden fruits, veggies and whole grains. They are easy to make and if you don’t have all ingredients listed you can still make these! For example add chocolate chips instead of shredded carrots or more apple sauce if you don’t have banana. This is  a standard muffin recipe so get creative! You can leave out topping if short on time. The almond flour really gives these a mellow flavor and adds some much-needed protein to the remainder of ingredientsimage. Made with almond flour, banana, oats, raw yogurt, applesauce and shredded carrots you wouldn’t think these would taste so good. My kids ate two each and are very picky eaters! I freeze remaining and warm up on school days or use as an easy wholesome travel snack.

Ingredients:

  • 1 c. Almond Flour
  • 1 1/2 c. Flour
  • 1 1/2 tsp Salt
  • 1 1/2 tsp Baking Soda
  • 1 tsp Cinnamon
  • 1 Ripe Banana
  • 1 c Apple Sauce
  • 1 1/2 Raw Yogurtimage
  • 1 c Maple Syrup
  • 1/2 c Brown Sugar
  • 1 Egg
  • 1 c Shredded Carrot
  • 1/2 c (1 stick) Butter
  • 1 C. Oats

Topping:

  • 1/4 Butter
  • 1/2 c Oats
  • 1/2 Almond Flour
  • 1/2 c Brown Sugar
  • 1/4 c Maple syrup

Directions:

Preheat oven to 350 F. Spray 2 muffin tins with non stick baking spray. (Pam for baking- the best stuff comes w/ flour!)image Melt the stick of butter in large bowl in microwave.  Place banana, brown sugar, applesauce, yogurt, maple syrup, shredded carrot in bowl and mash with masher (kids love this job). Add the oats and let sit while you combine dry ingredients. Sift flours, salt, baking soda and cinnamon together in medium bowl. Lightly whisk in egg to wet ingredients. Fold the dry ingredients into the wet slowly. Mix will be very lumpy, trying not to over mix! Add the mixture to muffin tin 3/4 of way to top. Prepare topping Microwave 1/4 c butter, add brown sugar, oats, maple syrup and flour. combine using fingers and drop a little on top of each muffin. Place in oven and remove after cooked through and golden brown (approx 15 min). Place on cooling rack and enjoy!

image


Cultured Chocolate Chip Cookies

Raw yogurt chocolate chip cookies, What?? I use my cultured yogurt in EVERYTHING- and it makes it all better. You wont have the health benefits of eating raw yogurt with these cookies, but it makes the standard cookie dough recipe more chewy and interesting, not cake like or dense but light and chewy! This recipe is created to freeze a bunch to share later- about 4 dozen! You can cut recipe in half. See my recipe below-

image

Ingredients:

4 1/2 c flour
2 tsp baking soda
2 tsp salt
2 cups (4 sticks) butter
1 1/2 c sugar
1 1/2 c brown suga
4 eggs
2 tsp vanilla
1/4 c cultured yogurt
4 c semi-sweet chocolate chips

Directions:

Preheat oven to 375 F. Sift together flour, salt and baking soda. Cream sugars and room temperature butter on high for 2 min until light and fluffy. Add one egg at a time until blended on low, then add yogurt. Add vanilla. slowly add dry ingredients until incorporated. If dough seems too sticky add 2 tbsp flour. Fold in chocolate chips. Drop by tbs rounds on parchment prepared baking sheets. Cook 8-10 minutes until golden brown. Drink with milk and enjoy!!


Easy Cultured Yogurt in the Oven

007
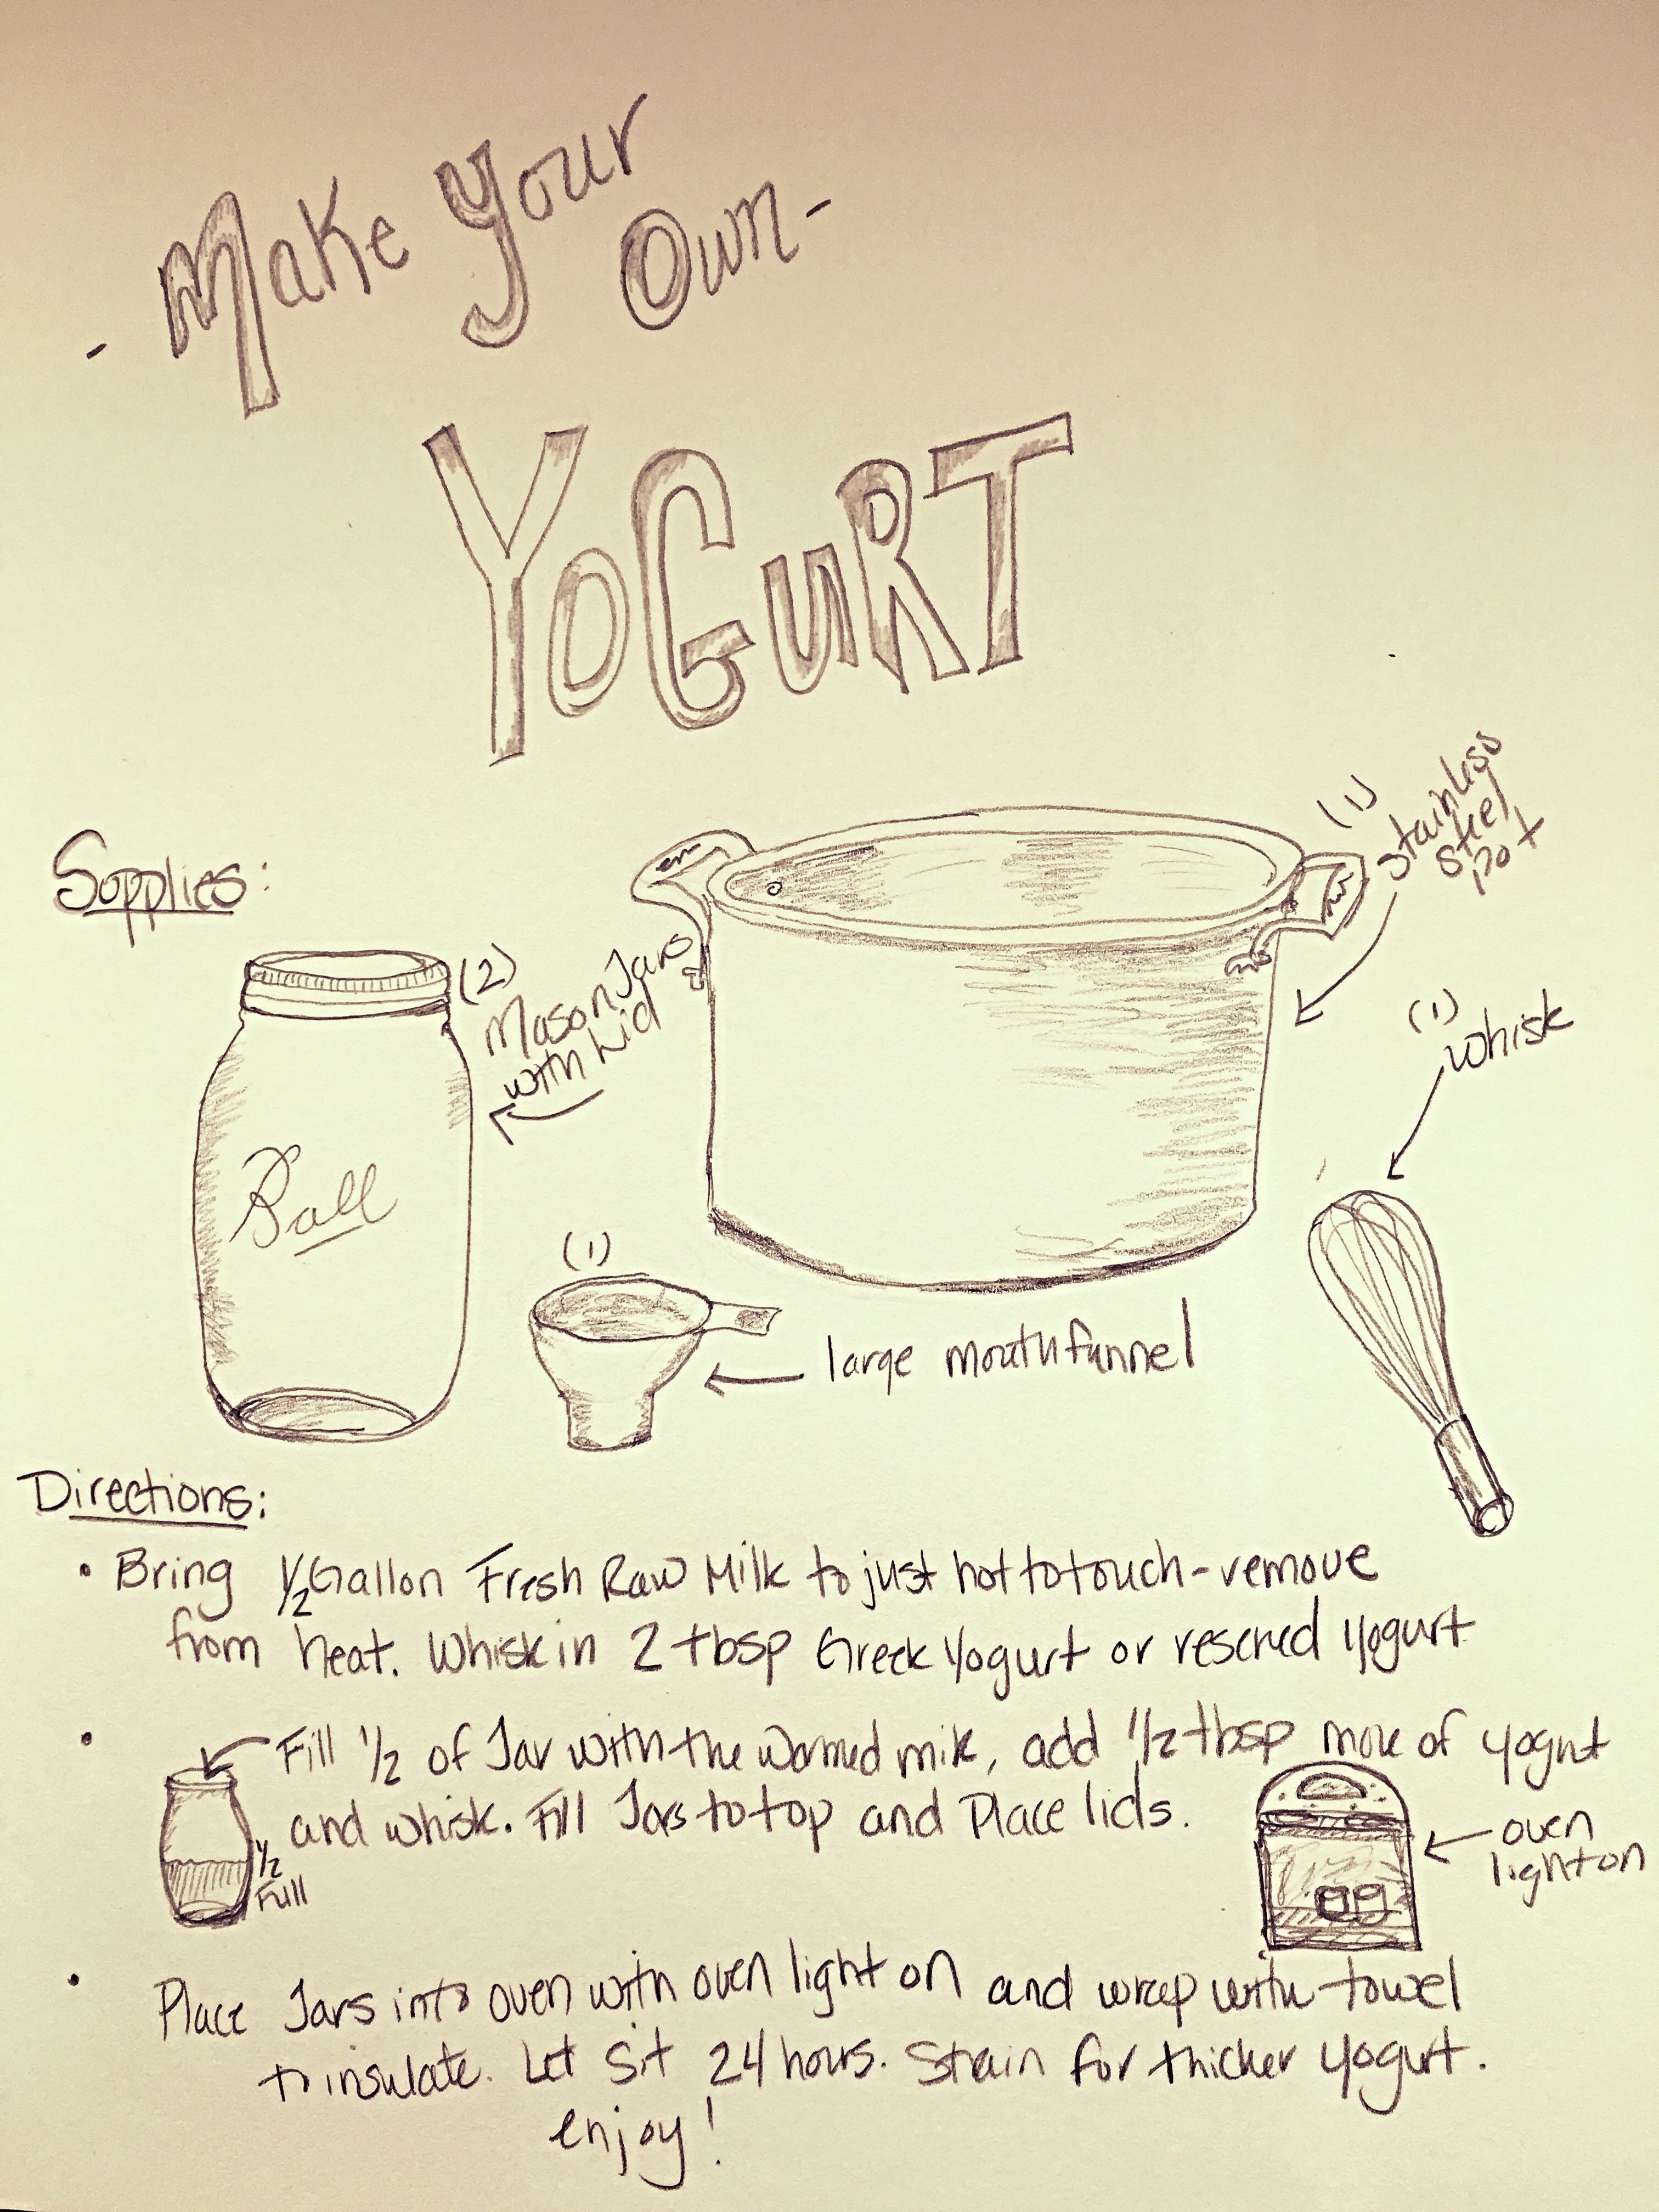
You won’t believe how easy this is! The trick here- you must have access to raw milk.  It’s too bad we don’t have more access to farm fresh milk to make cultured cheese, butter and yogurt. There are many health benefits found  in fresh milk that has not been pasteurized or homogenized, thereby retaining its healthy living cultures. To read more bout this visit realmilk.com. This recipe is something fun, easy and healthy you can do for your family. I use this yogurt in so many things- pancakes, muffins, salad dressing, dips, smoothies, marinades and on and on! It is a staple for our family, and gives a satisfying feeling  to visit the dairy to pick up my fresh supply of jersey milk, create recipes with it while knowing I am  doing something to support the health of my family! After  you make this save a cup to use to culture your next 1/2 gallon of raw milk, rather than use store bought yogurt the next time!

Step 1:

Turn on oven light and gather supplies.

Supplies needed:

  • 1/2 gallon raw fresh milk
  • Whisk
  • Large clean pot
  • 2 clean large mason jars with lids
  • Funnel ( to make pouring in jars easier)
  • 1/4 c plus 4 Tbs  high quality plain yogurt ( I like using greek yogurt)
  • Oven with oven light and Towel for insulation.


Step 2:

Pour your milk into large pot and heat on medium. (This is hardest part so don’t get sidetracked). Wait until milk is right temperature by using the finger test. (about 8 minutes) That’s right- no fancy thermometers needed!! You will know its right when you test temperature with (clean) finger and feels just to the point of uncomfortably hot! Remove from heat immediately, add 1/4 c of your yogurt and whisk until incorporated.

009

Step 3:

Add 2 tablespoons of your yogurt to bottom of each empty mason jar. Pour still warm milk until halfway full. Whisk the yogurt and milk together. Add more milk to top of jar. Give another good whisk and repeat with next jar. You will probably have a little left over.

010

Step 4:

Place lids on jars, put side by side close to oven light. wrap with towel to keep insulated. Close door and leave note with message “do not turn off light or use oven!” Promise  you’ll be glad you did, learned this the hard way! Leave in oven for 24 hours. Yogurt will not be consistency of Greek yogurt but thinner. If thicker yogurt is desired place in tea towel and drain off whey over sink for 6-12 hours.Use whey for added nutrition in smoothies or stocks.  I have found thinner is the desired consistency to use in recipes.Store in fridge and use within 2 weeks. If there is any question with contamination- funny smell, taste or visible growth discard. Don’t forget to save around a cup of your yogurt to make the next batch!