

This as simple a way to make a pressed cheddar cheese, I will also include illustrated instructions on how to make your own press! You can create fresh cheddar curds without the use of a press. They taste good and are immediately gratifying. The aging and use of press for hard cheeses makes the cheese special and creates a depth of flavors as time goes on. You can get creative and try different pressing and aging times, then sample the cheeses as time goes on. I did not get that far. I put my lovely pressed cheese to dry on the counter and the kids and I got too curious. We tried it and it was delicious, and gone before dinner. Either way it was fun to create and making cheese is such an art form. You can try to measure temperatures, time, weight, and ingredients just right but it really comes down to intuition and taking the time to know the process and sticking with it. Like any art. Cheese making is a skill I am still learning and to me that is the fun of it. I’m going to outline through my experiences the easiest simplest and least fussy way to have a successful cheese. There are a whole lot of other recipes out there that go into more depth but I’m going to keep it as fun as possible, kids love this because it is a science experiment with yummy results!

Ingredients:
- 2 Gallons Raw Milk
- 1/4 Tsp Mesophilic culture (see Picture)
- 3/4 Tsp Animal Rennet
- 2 Tbsp Cheese salt or fine sea salt
Directions:
Put the milk in large clean stainless steel pot and slowly warm milk to around 80F, or just until milk feels on verge of getting hot. Sprinkle the culture into milk and stir well with whisk.


Cover and allow the milk to culture for around 45 minutes. I put this in the oven with light on and towel over top. Mix rennet in 1/4 C water and stir well into the milk. Cover and allow to sit another 45 minutes. It is now that a curd will begin to form. Using the blade of a long knife ( I use a cake frosting knife) you can literally cut into the curd. Make long cuts length wise and across to form 1/2 inch cubes. See picture.


Be gentle as the less you handle the more delicate your cheese will be. Let the now cut curds rest for 10 minutes. Then move pot to burner and heat to a little over 100 F for 40 minutes, stirring gently to keep curds form sticking together. Scoop out the curds with a strainer or slotted spoon into a colander. Allow the curds to rest in the colander and drain over the still warm pot. Let the curds drain for an hour, turning the curds to drain well and keep the whey below warm to allow the process of “cheddaring” to occur.

It is now that the cheese will take on a squeaky texture, which the kids love to sample. Then remove the curds form the strainer and cut into 1/2 inch chunks. Put them in a bowl and toss with the salt. It may taste very salty but as the cheese is pressed, the salt comes out with the whey, so it is better to be a little heavy with the salt.
Creating a Cheese Press:

Directions for Pressed Cheese:
Line the cheese mold with cheesecloth, I use a tea towel, and fill with the cut curds. Place on center of cheese press with pan to collect whey underneath. Place follower on top. I then put an empty mason jar which fits in lid. Place top wooden board and add 10 lbs weight for an hour. Take out cheese and cloth and turn over.


Replace weight and press an additional hour. Add 10 lbs and press overnight. Remove cheese and let air dry for 4 hours. You may eat fresh . Will last 2 weeks in refrigerator. Age for flavor in cool dry place with wax for 4 weeks and up to 6 months, even longer if desired! The longer the cheddar ages, the sharper the cheddar becomes! Enjoy the process and let me know how your trails go!


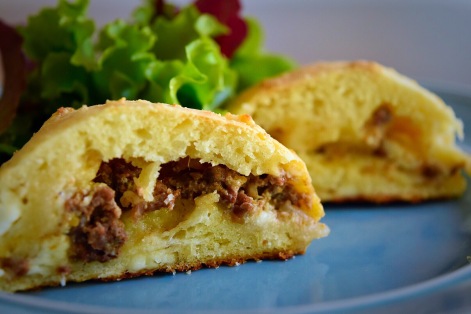 This recipe was inspired by a traditional Georgian bread called “Cheese Bread” I came across the recipe for “Cheese Bread” in my favorite cook book
 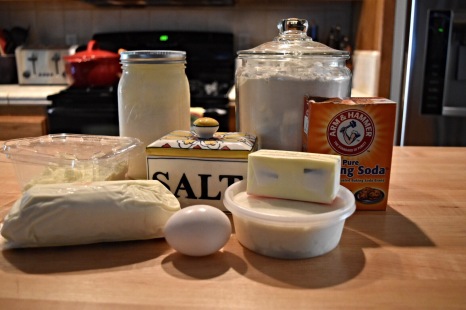 Ingredients:
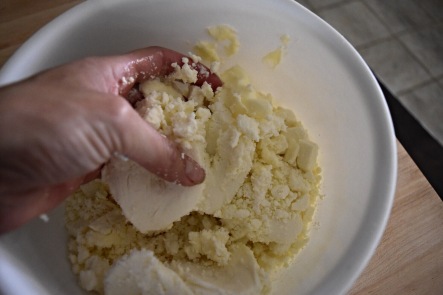 Directions:
 Feel like doing a science experiment? This is such a fun thing to do and with kids or a partner even better! Such a simple cheese to learn. You can get the hang of this after a couple of times and always have fresh ricotta on hand. Use ricotta similarly as you would use yogurt, in baked goods, and of course lasagna. Try with my


 This is my go to salad dressing. I haven’t met any one who doesn’t care for it, including my kiddos. It has a balance of sweet, salty, tangy and the silky texture is divine for any salad. Would also work as a great marinade. Try adding a twist of your own, maybe a hint of heat? I use my home made raw yogurt, you can also use store bought plain or Greek yogurt. We also use our Aunt and Uncle’s olive oil,


 If you think this does not sound good for breakfast, I promise it is perfect for brunch and even for dinner! Yummy fresh layers of cheese, eggs, hash browns all with a light marinara. I found myself making two, a smaller one for dinner and a larger one for a brunch the next day. This is a great make ahead dish, pop it in the oven the next day. I used my home-made
 I painted this pumpkin platter and made these pumpkin muffins in hopes that fall will come early! A portion of proceeds from this platter goes towards your local food bank and can be purcahsed at


 We loaded up the kids to visit the ranch and do some berry picking. Was made all the more exciting as this is rattle snake season- Yikes! Safe to say dad did most the picking! When visiting my parents on the coast we made black berry pie with black berries picked behind pops gallery. That was little more leisurely experience! Either way, using your fresh picked blackberries in this simple dessert the whole family will love! I use my


