Cherry Sauce

img_0706This sauce is in no way reminiscent of the cherry flavored medicine we got as children…

What a joy to be able to visit with friends down the road and be sent home with fresh picked cherries. In an effort to not waste these beauties I decided to make batches of cherry sauce that can be used as a filling in pies, tarts or turnovers, mixed with yogurt or cottage cheese, in cheese cake, and drizzled over pancakes or ice cream. Use a cherry-pitter or simply cut out with paring knife. This is the time-consuming portion, promise its worth it!

Ingredients: (Recipe may be doubled.)

  • 2 C Bing cherries
  • 1/4 C Sugar
  • 2 Tbsp Maple Syrup
  • 2 Tbsp Lemon Juice
  • 1 Tbsp Corn starch

Directions:

Pit Cherries and place in large stock pot. Heat on low and add sugar, syrup and lemon. Simmer for 10 -15 minutes until cherries are heated through. Use immersion blender to blend.

Heat on high until thickened slightly. Allow to cool and pour into jars for preserving if desired. May be stored in refrigerator for 3 weeks or freezer for 9 months without preserving. Enjoy and keep me posted on the many uses you find!

img_0524

Lemon Curd and how to use it!

img_0251

“Lemon Curd”- This does not sound appetizing, but this traditional English fruit spread makes a breakfast, dessert or snack extra special. This recipe is very simple to make, I recommend Meyer lemons, and I tearfully  used the last of our home grown lemons for this recipe. If you have excess lemons consider making a large batch and preserving. You can always double this recipe, although this is a large recipe designed to have extra for later use or gifts, so you can also cut this in half! There are many uses for this curd. Make a sheet cake, poking holes in cake while still hot and poured the lemon curd over and topped with fresh whipped cream for an Easter dessert. You can also use with pancakes, as a spread for muffins or scones, as a dip for crackers or fruit, as well as a marinade or salad dressing when mixed with basic balsamic and olive oil. Mix into yogurt or oatmeal, try my easy method to make your own yogurt.

img_0248 I loved this curd with my recipe for Brown Butter Maple Oat Muffins, place a dollop of the lemon curd on top of the batter before baking. Try it and enjoy!

Ingredients                                                                                     Yields 6-8 Cups

  • 6 lemons
  • 2 1/2 C Sugar
  • 2 Sticks of Butter
  • 8 Large Eggs
  • 1 C Lemon Juice
  • 1/4 Tsp Salt

Directions

Zest the lemons, being careful not to get too much of the white pith, which will create a bitter taste. Mix zest and sugar in food processor until incorporated. With stand mixer cream butter and and sugar with zest. Add eggs 1 at a time and finally the lemon juice and salt. Pour the mixture into saucepan over low heat until just thickened and hot to the touch (around 8 minutes on lowest heat setting). Remove from heat and place in jars for refrigeration and preserve if desired.

img_0239

A Simple Way to Make Cheddar Cheese and Your Own Cheese Press!

This as simple a way to make a  pressed cheddar cheese, I will also include illustrated instructions on how to make your own press!  You can create fresh cheddar curds without the use of a press. They taste good and are immediately gratifying. The aging and use of  press for hard cheeses makes the cheese special and creates a depth of flavors as time goes on. You can get creative and try different pressing and aging times, then sample the cheeses as time goes on. I did not get that far. I put my lovely pressed cheese to dry on the counter and the kids and I got too curious. We tried it and it was delicious, and gone before dinner. Either way it was fun to create and making cheese is such an art form. You can try to measure temperatures, time, weight, and ingredients just right but it really comes down to intuition and taking the time to know the process and sticking with it. Like any art.  Cheese making is a skill I am still learning and to me that is the fun of it. I’m going to outline through my experiences the easiest simplest and least fussy way to have a successful cheese. There are a whole lot of other recipes out there that go into more depth but I’m going to keep it as fun as possible, kids love this because it is a science experiment with yummy results!

img_9633

Ingredients:

Directions:

Put the milk in large clean stainless steel pot and slowly warm milk to around 80F, or just until milk feels on verge of getting hot. Sprinkle the culture into milk and stir well with whisk.

Cover and allow the milk to culture for around 45 minutes. I put this in the oven with light on and towel over top. Mix rennet in 1/4 C water and stir well into the milk. Cover and allow to sit another 45 minutes. It is now that a curd will begin to form. Using the blade of a long knife ( I use a cake frosting knife) you can literally cut into the curd. Make long cuts length wise and across to form 1/2 inch cubes. See picture.

Be gentle as the less you handle the more delicate your cheese will be. Let the now cut curds rest for 10 minutes. Then move pot to burner and heat to a little over 100 F for 40 minutes, stirring gently to keep curds form sticking together. Scoop out the curds with a strainer or slotted spoon into a colander. Allow the curds to rest in the colander and drain over the still warm pot. Let the curds drain for an hour, turning the curds to drain well and keep the whey below warm to allow the process of “cheddaring” to occur.

img_9622

It is now that the cheese will take on a squeaky texture, which the kids love to sample. Then remove the curds form the strainer and cut into 1/2 inch chunks. Put them in a bowl and toss with the salt. It may taste very salty but as the cheese is pressed, the salt comes out with the whey, so it is better to be a little heavy with the salt.

Creating a Cheese Press:

img_9632

Directions for Pressed Cheese:

Line the cheese mold with cheesecloth, I use a tea towel, and fill with the cut curds. Place on center of cheese press with pan to collect whey underneath. Place follower on top. I then put an empty mason jar which fits in lid. Place top wooden board and add 10 lbs weight for an hour. Take out cheese and cloth and turn over.


Replace weight and press an additional hour. Add 10 lbs and press overnight. Remove cheese and let air dry for 4 hours. You may eat fresh . Will last 2 weeks in refrigerator.  Age for flavor in cool dry place with wax for 4 weeks and   up to 6 months, even longer if desired!  The longer the cheddar ages, the sharper the cheddar becomes! Enjoy the process and let me know how your trails go!


Brown Butter Maple Oat Breakfast Muffins; Learn my Quick, One Pot “Blank Canvas”  Recipe, and a lemon version

img_9499I’m bringing muffins back! Some of you may be thinking, I never knew muffins were out, neither did I! That was until I went to research muffin recipes in my new cook book and nada! Looking further online, it seems the culinary world has turned its back in this American staple. The muffin  is underrated and seen as creation that takes little skill that has now been confused with its trendier counterpart the cupcake. Muffins were created in America, different from the English version, this muffin was a batter that required a tin, and baking powder, which wasn’t invented until the late 1800’s. Muffins were traditionally made by hand, but modern bakeries wanting to make them more light like the much desired cupcake,  added more sugar and used a mixer to add dry to wet ingredients. Personally the muffin means a lot to me. It has been a wonderfully easy way yo be creative as a busy mom, and feed my kids a wholesome snack at the same time. Muffins are versatile and a great way to use seasonal fruits an vegetables. The possibilities are endless, and in using traditional methods with high quality  ingredients its like creating a work of art. It has taken me time to be able to not have to look at a recipe, creating a stand by muffin recipe that I can make quickly,  being able to get creative with what I have, and double easily to share. My recipe takes one pot, little mess and little time. I usually can make these in 10 minutes or less and you can too! Think of this recipe as a blank canvas. The ingredients should be the freshest you can find. If you can take the time to make fresh yogurt  I encourage it. See my recipe for homemade yogurt. Besides added health benefits, yogurt tenderizes baked goods. The homemade yogurt makes this muffin special, and creates a feeling of accomplishment. Get cookin’!

Ingredients

img_9515

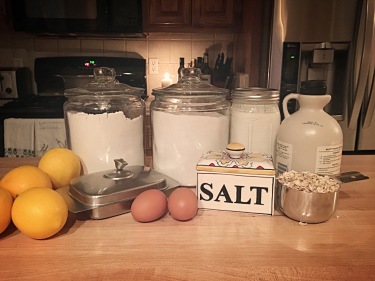
Everything here except the Baking Soda and Powder

  • 3 C flour
  • 1 C Rolled Oats
  • 1 Tsp Baking Powder
  • 1 Tsp Baking Soda
  • 1 Tsp Salt
  • 3/4 C Sugar
  • 1/4 C Maple Syrup
  • 2 Eggs
  • 1 C yogurt
  • 1/2 C Butter (melted)
  • 1/2 – 1 C add ins- see below.

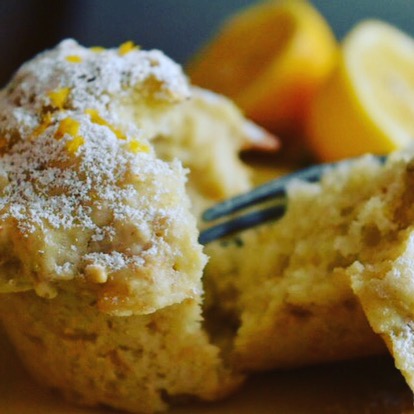
For Lemon Oat Muffins:

  • Juice and Zest of 2 Meyer Lemons
  • Powdered Sugar for dusting.

Other ideas for ad ins for both sweet and savory muffins include ; Apple sauce, Fruit puree or whole berries, chocolate chips, almond butter, roasted nuts, pureed vegetables like carrot or cauliflower, cheeses, grated zucchini, and the list goes on! You can adjust the add ins by decreasing the amount of yogurt or butter used. For example if you want to add 1 C apple sauce use only 1/2 C yogurt.

Have fun creating new muffins to try with your family. The portable nature of a muffin makes it such a great convenience and a way to pack nutrition into your day without hitting the drive thru, taking time and money. Remember these also freeze great for later use so stock up when you have some extra time to bake!

Directions;

In large pot melt butter. If making Lemon Muffins as pictured above, add lemon zest and juice. Let butter cool slightly. Add sugar, yogurt, maple syrup and oats, stir.

Place sifter over pot and sift in flour, salt, baking powder and soda.

Make a well in center of flour crack in 2 eggs. Using a fork beat the eggs until yoke and whites combined, then fold into dry and wet ingredients until just combined. Do not over mix, batter should be lumpy and this is OK. Spoon into buttered tins.

img_9508

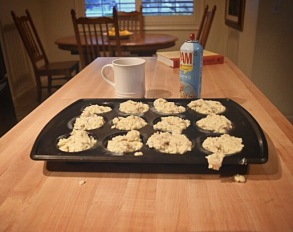
You can never over fill and muffin tin!

bake 350 F for 15-20 minutes, or until tooth pick comes out clean. For Lemon Muffin sift tops with powdered sugar and additional lemon zest. Enjoy!


Art to FEED; “Community Hearts” and the Children’s Center at Modesto Gospel Mission

img_9466

Myself, Lilly and the lovely Angela, a volunteer at the center. 

Sometimes reality can  hit you hard. Going to the Modesto Gospel Mission to volunteer at their children’s center one evening with a group from church, I remember thinking, will there really be a need? Do we have too many volunteers to really help, will we be standing around, wanting to be helpful but doing so in vain. Many different thoughts come up whenever we try to do something of value. We start to believe all the negative voices, the ones that keep us from getting up and out to help. The sad reality is our world is a fallen one and the need is overwhelming. In entering the children’s center I had to take a seat. I was hit with this reality that exists in my own back yard. Children, infants, families without hope. I also write this having lost a childhood friend last month, after drug addiction and living on the streets ended in tragedy.  I don’t believe you need a worldly perspective to look around your own community and know things aren’t right.

Modesto is increasing in it’s population of homelessness,(Modesto Bee, August 2015). An increase in alcoholism, drug addiction, low literacy rates and mental illness seems to be only fueling this problem. It is easy for many to ignore this issue, how would one even begin to help?  One only has to drive down the La Loma neighborhood of Modesto, an area I used to ride bikes as a child, and one can see this growing problem first hand. The Modesto Gospel Mission exists here to help, and the children’s center offers a safe place for children who otherwise would have nowhere to go but out on the streets. This is a home to many, a community to many. It is at times a chaotic and volatile place, but there are much needed rules, structure, warmth and encouragement. The Mission has aims to improve community with a larger medical facility, women’s center and a newly purchased warehouse in order to teach skills for employment to its participants in their program. We donated our “Community Hearts” painting, done at the Homestead Market Fair in Ripon, CA. The painting was done by the community, who all painted their “hearts” as a symbol of support for the children’s center at the Modesto Gospel Mission.

Many homeless desire to work and be productive. Art to Feed has a vision in line with our philosophy that connecting people with food and agriculture improves community. This year we plan to create a small maintainable garden providing fresh produce for a salad bar daily for the children, women and men that come to the mission for meals. The garden will also teach skills and allow for a positive environment for the residents and the community that surround the garden. We also hope to incorporate some children’s programs with the help of a local garden club. We envision the garden growing every year and possibly leading to the selling of produce at local farmers markets, providing employment and skills for our homeless community. There have been successful models with a similar concept by Sol Food Street Farms, and we can only aspire towards this. For now a garden. I am not naive to think that this will solve all of our problems. But its a small step, and as one resident said in hearing of our plans, a much needed bit of “life.” Giving something living to take care of and watch thrive in an environment that is so accustomed to  failure is enough of a step for me and one I cant wait to get started.

If you are interested in donating towards the garden I will be having an art show thru February at the Carolyn Huff Gallery in Modesto, also a part of the down town art walk. All proceeds will be used to fund this garden. If you are interested in volunteering for the Modesto Gospel Mission, or just to learn more you can attend their monthly tours, and visit them online to learn more or donate at http://modestogospelmission.org/


Split Pea Soup with Horseradish and Tarragon

img_9386In the heart of everyone is a little country and a desire for simpler things. I don’t care where you are from or where you are now, this is true in all human beings. A soup like this is meant to be created and not ordered. This is as old school and traditional country as it gets. I spiced this up with fresh grated horseradish root and Verde sauce (courtesy of my mother and inspired by the taco Christmas eve shared with employees at dairy).  The spice cuts through the sweetness and richness of the ham and peas. I also brighten it with Meyer lemon and tarragon from our garden. Fresh garlic, onion, bay leaf and a little nutmeg add warmth. I did not have any carrot at the time, but if you have some add a couple large carrots chopped, as this is a great addition! I love this as a meal served with crusty bread and fresh butter.  Make an extra batch to share!

Yield: Approx 6 large servings                               Time: Preparation; 30 min. Cooking: 4 hours

Ingredients: img_9375

  • 2 1/2 C Split Peas Dried
  • 2 1/4 Quarts Water
  • 1 1/2  Lbs Cubed Ham plus Ham Bone
  • 1 Tbsp Chicken Bouillon
  • 2 Tsp Fresh Cracked Pepper
  • 2 Stalks Celery
  • 1/2 Medium Yellow Onion
  • 3 Cloves Garlic
  • 2 Tbsp Fresh Grated Horseradish Root
  • 1/2 C Verde Sauce
  • 1 Tsp Nutmeg
  • 2 Bay leaves
  • 1 Tbsp Dried Tarragon or 2 Sprigs Fresh Tarragon
  • 2 Tbsp Olive Oil
  • 1 Tbsp Meyer Lemon juice

Directions:

Melt butter in dutch oven or large stock pot. Add chopped onion, garlic and celery. Season with salt, pepper and nutmeg, and saute until transparent and softened. Grate fresh horseradish into vegetables. Add cubed ham and ham bone. Saute an additional 5 minutes to render flavor. Add Split peas, and cover with water. Add chicken bouillon and stir. Bring to boil an then turn heat to low. Cover and simmer for one hour.

Add bay leaf and tarragon, (I use something called a soup sock for herbs to be removed) and simmer an additional 3 hours, or until peas are cooked through and soup has thickened. Stir in Verde sauce and lemon. Garnish with additional fresh grated horseradish and serve with crusty bread and fresh butter! Enjoy this warm country meal and share with friends! May freeze for up to 4 months.

Dad, Uncle Jack, Aunt Angie and the kids at dairy Christmas Eve. Enjoying Oysters and fresh tacos with homemade Verde and guacamole prepared by the workers to share in celebration. A feast at the shop!


Hot Butter Rum Crepe Cake

img_9228Hot Butter Rum Crepe Cake! Crepe Cakes are a new discovery, and really is it necessary to make a cake out of crepes? Yes! We love our pancake mornings, and in deciding to try crepes  for the kids, I remembered an image of a crepe cake with it’s layers and layers of goodness. For the holidays a pastry creme with hot butter rum pair deliciously with these apple crepes! We used our Auntie Dana’s applesauce for the crepes and a little “pannenkoeken” or dutch pancake mix to add to tradition and meaning for our holiday!

This is a new adventure for me, as I have neither made pastry cream or crepes. The first img_9223cake was a disaster, as I used my own made up version of a crepe, which was more of a pancake and the layers were course and hard, not soft and light. So, in the second attempt, take my recommendation and stick to a traditional crepe recipe, yes they are more than just thin pancakes!  This really was simple to make, especially if you take it in steps, the longest part being making all the crepes.You need around 20 crepes to make the cake, and it goes fast once you get the hang of it!  You can  make the crepes well in advance and they will freeze beautifully until ready to be assembled. The pastry cream can be made a day or two before as well.

If you have not made pastry cream before, be ready for a bit of a science experiment! I’ll walk you through it with a few tips on what not to do, as learned! The kids and I really had fun watching the sudden formation of a solid from a liquid as the cream thickens.

Ingredients:

Crepes:img_9282

  • 5 Tbsp Butter
  • 1 1/2 C Flour
  • 1/2 C Pannenkoken ( if available, otherwise substitute with additional 1/2 C flour)
  • 3 C Milk
  • 1/2 C Applesauce
  • 6 eggs
  • 5 Tbsp Sugar
  • 1 Tsp Salt

Pastery Fillingimg_9281

  • 2 C Whole Milk
  • 2 Eggs
  • 2 Egg Yokes
  • 1/2 Tsp Salt
  • 1 C Sugar
  • 2 Tbsp “Hot Butter Rum Mix”
  • 1/4 C Corn Starch
  • 3 Tbsp Butter (Cold and Cut into pieces)
  • 1/4 C Whipping Cream
  • 3 Tbs Sugar

Directions:

Crepes: Mix Flours, salt and sugar in medium bowl. Melt butter. In mixer beat eggs and add  milk and applesauce, and then dry ingredients. Add melted butter and mix until just smooth. Allow to chill for at least 30 minutes or overnight. Heat medium non stick round pan over medium heat. Add approx 3 Tbsp of batter to pan and swirl to cover the entire bottom surface of pan. Wait 1-2 minutes and using hands gently flip crepe by grabbing edge. This may take a couple tries, but once you get it down will go fast! Place on plate and use paper towels or parchments sheets between each crepe so they do not stick together. When finished allow crepes to cool and then wrap in seran and place in refrigerator or freezer until ready to assemble and up to 2 months.

Filling: Heat milk and Hot butter rum mix  in saucepan until very hot but not scalded. Beat eggs, egg yokes and salt at medium speed until thickened, add sugar 2 tbsp at a time until thickened and pale. On low speed beat in cornstarch until smooth, then add milk a spoonful at a time as to not “cook” the eggs. Then pour mixture back into sauce pan that was used to heat the milk and add cold butter pieces. Cook over medium heat with constant stirring using a spatula, scraping across sides and bottom. It will begin to form thick lumps on the bottom, continue scraping (this is the science experiment part!) Once mixture is fully “lumpy” switch to whisk and whisk for 5 to 7  minutes until mixture is smooth. Pour into bowl. In chilled bowl (helps cream thicken faster) of mixer beat whipping cream and sugar on high until thick peaks form. Fold into pastry cream. Place plastic wrap down into bowl touching the surface of mixture. This will keep any “skin” from forming.


When ready to assemble cake lay a crepe down on desired serving dish and add 1/4 C pastry creme mixture, then layer with remaining crepes and repeat layers. Top with extra whipped cream and sprinkle with cinnamon and powdered sugar. Enjoy!


Habanero Limoncello

img_9220

A little sunshine for this holiday season! I just love the hue that limoncello turns  as it marinates with lemon zest. Limoncello is essentially an infused vodka, a traditional drink originating from Italy. Using our Meyer lemons, I wanted to try making limocello for the first time. A suggestion from a friend, thanks Ellen! I added a kick by using habenaro vodka, which I had on hand. It turned out great, and not too spicy, but you can also use regular Vodka as well. Lemoncello can be enjoyed by itself, or as a mixer with champagne, ginger ale, (think moscow mules), or create your own!  Lemoncello only uses the zest of the lemon, so juice the remaining lemons to create other holiday treats, lemonade or freeze juice in ice cube trays for future use. This makes a unexpected gift and freezes well once made to enjoy during summer!

Ingredients:

  • 10 Lemons
  • 750 ML Premium Habenaro Vodka (Regular Vodka ok as well)
  • 3 1/2 C Water
  • 2 C sugar

Directions:

With very sharp knife or potato peeler remove the outer rind of lemon, trying to avoid the inner white pith. Too much pith in the vodka will make a very bitter drink. Place rinds evenly in jars, and add vodka till 3/4 way to top. Place on lid and allow to rest in dry dark place for 1-3 weeks. Then make a simple syrup by adding the water and sugar and heating sugar until dissolved. Stir often. Allow to cool. Pour vodka with rind through strainer into the pan with simple syrup. Stir and pour into jars. Allow to rest further an additional week in refrigerator. Enjoy and give!

img_9232

Meyer Lemon Cheesecake Cookies; Sprinkled with Cinnamon Sugar and Zest

img_9008Meyer Lemon Cheese Cake Cookies with Cinnoman Sugar and Zest

Our Meyer lemon tree  is officially producing! All year I wait for these beautiful lemons, a signal that Christmas is also approaching. In trying to take a step back this season (cards not done, shopping to be finished) it’s time to make cookies!

Some one once said they are working to view their children as little beings that need to be nurtured, and not as objects in the way. How often I need reminding. This is a cookie you can have fun with. Kids can put there thumbprints in them, they do not have to be perfect. I place graham crackers in a bag for the kids to pound and smash-up.

I used a lemon blue berry juice I happened to have made, and fresh yogurt  I make from our diary farm,  but just fresh squeezed lemon juice and greek yogurt will work fine. Try adding a dash of pomegranate as well for festive flair.

Yeild: Approx 46 Cookies                                                      Time: Prep- 30 min./ Cook- 15min.

Ingredients: 

  • 1 1/2 C  Graham Cracker Crumbs (approx 1 sleeve)img_8998
  • 2 C Flour
  • 2 Tsp Salt
  • 2 1/2 Tsp Baking Powder
  • 2 Sticks Butter, softened
  • 1 C Brown Sugar
  • 2 Eggs, separated
  • 8 oz Cream Cheese, softened
  • 1 Tbsp Yogurt
  • 1/2 C Sugar
  • 2 Tbsp Lemon Juice
  • 3 Tbsp Lemon Zest
  • 2 Tbsp Cinnoman Sugar

Directions: 

Preheat Oven to 350 F. In large bowl mix flour, baking soda, graham crumbs, and salt. In bowl of mixer beat brown sugar and butter until fluffy. Add egg white and beat until combined. Fold into large bowl with flour mixture until just combined. Mixture will be crumbly this is ok!

Replace bowl of mixer and add softened cream cheese and granulated sugar. I chose not to wash bowl, just to use it again for the filling. figure it’s all going to the same place right? Turned out just fine, and when your cooking with 3 kids you have to learn to cut your corners! Once cream cheese is fluffy, add yogurt and zest of 1 lemon (zest only the yellow, trying to avoid the white pith as this is very bitter). Add egg yolk and beat until just combined.

On parchment lined baking sheets place large table-spoon full of graham cookie mixture. Flatten with thumb to make indent in center and repeat. Add 1/2 tbsp full of cream cheese mixture in center. It is ok if it over flows, I tend to like the look of this luscious cream cheese mixture overflowing, but if you want a neater cookie add a  smaller amount at a time. Bake until filling is set and cookies are golden brown. Approx. 12-15 minutes.Sprinkle with cinnoman sugar and another good zesting of lemon if desired.  Cool on baking sheet for 5 minutes and them transfer to wire rack. Enjoy!


Festive Persimmon and Pomegranate Cookies


These persimmon and pomegranate cookies are for when you really want to share something special during the holidays. So many people I shared these with  had fond  memories or persimmon cookies during the holidays. This cookie surprises as it has a little twist. I use persimmon and pomegranate . I use my Christmas Jam in these, and this recipe is a snap if you already have the jam on hand. See my recipe and make extra for gifts to go along with these cookies. Persimmons and Pomegranates are two very special ingredients, that is very expensive at the stores, but I was lucky enough to have a neighbor with an ancient Pom tree as well as a long-standing persimmon tree up in knights ferry. Make your holiday extra special by making these cookies! The cookies freeze nicely, and kids love them as well! Glad I wrote down the ingredients when creating this recipe, and hope you will enjoy!

Yield: Approx 20 Large Cookies                                             Time: 45 Minutes

img_8865

Ingredients:

  • 1 C Butter
  • 1 1/2 C Sugar
  • 1/2 C Brown Sugar
  • 2 Tbsp Yogurt ( Try my Recipe to make your own!)
  • 1 1/2 C Christmas Jam
  • 1 Tbsp Vanilla
  • 2 Eggs
  • 4 C Flour
  • 2 Tsp Salt
  • 2 Tsp Baking Soda
  • 2 Tsp Baking Powder
  • 3 Tsp Cinnamon
  • 3 Tsp Nutmeg

Directions: 

Preheat oven to 375 F. Sift Dry ingredients into bowl and set aside. In bowl of mixer add butter and sugars, cream on high until light and fluffy. Add  jam and yogurt, mix until smooth.  Adding one egg at a time, beat at  low speed until just incorporated.

img_8864

Hint: Batter can be clumpy, its best to not over mix eggs, they will mix once dry ingredients are added.

Slowly add dry ingredients, taking time to stopping to  scrape sides, adding 1/3 of dry mixture at a time until just blended together. Drop large rounded spoonfuls onto parchment paper 1 1/2″ apart. Bake for approx 12 minutes. Do not over cook, cookies are done when edges appear golden brown. Remove from oven and sprinkle with cinnamon sugar if desired. Happy Holidays!

img_8569