Sweet Potato Persimmon Cookies

img_4246


I love the combination of two classic flavors of fall in this cookie. The combination makes for a super soft nutritious cookie that you can even serve at breakfast. I add chopped pecans and oats to make a very filling cookie, and chocolate chips to entice my littles. We make an annual visit to the Maino Ranch in Knights Ferry, to pick persimmons at the ancient Hachyia persimmon tree. We then bring home the fruits of our labor, waiting for when they turn just ripe enough to scoop out their sweet flesh for use in cooking. Having never been a persimmon fan before discovering this tree, I now love them, both the cooking ( Hachyia) and the eating (Fuyu) variety. I enjoy this new tradition and watching the kids play and climb under the big tree. See our recipe using Persimmons for Christmas Jam from last year! This recipe is a great way to use left over sweet potatoes and pecans from your traditional thanksgiving dishes! img_4141

Persimmon Sweet Potato Cookies                                                       Yield: 24 Cookies 

Ingredients: img_4248

  • 3/4 C Mashed Sweet Potato Puree
  • 3/4 C Persimmon Pulp
  • 1/2 C Butter (softened)
  • 1 1/2 C sugar
  • 1 egg
  • 2 1/2 C Flour
  • 1 tsp Baking Soda
  • 1 tsp Salt
  • 1 tsp Cinnamon
  • 1 tsp Nutmeg
  • 1 tsp Ground Cloves
  • 1 tsp Ginger
  • 1/2 C Oats
  • 1/2 C Chopped and roasted Pecans

Directions: Pre-Heat Oven to 350 F. In bowl of stand mixer, mix on high sugar, puree, pulp, and butter until fluffy. Add egg on slow until just combined. Combine dry ingredients in separate bowl.


Slowly mix in dry ingredients into wet, stopping to scrape bowl. Fold in chocolate chips, pecans, and oats. Drop hearty size Tbsp dollops onto parchment lined baking sheet.


Bake for approx 25 minutes until cooked through. Enjoy!

The “Gospel Garden” and a recipe for Salsa Con Queso

Early winter of 2016 myself and enlisted help including Cody Simar of Central Valley Sustainability and my dear husband met with the director at the Modesto Gospel Mission to discuss a future community garden at their existing 1 acre plot surrounded by employee housing, and located a block behind the mission itself.

Approaching the site I knew this was the spot. Since this time we have been blessed to have many hands volunteer and come together to donate, plant, care for and harvest from this garden. We have affectionately named our garden the “Gospel Garden.”

Some crops have not worked out, we have had weeds overtake some of our lettuce and tomatoes. We have put in a lot of work to keep up with our first year at this new site. Yet, every time I visit the garden, when I feel overwhelmed at the work, at the weeds, at what needs to be done and when I can barely keep up with the kids, animal, and yard at home, I come away with a sense of calm. Chris, a resident at the mission, will usually stroll out and remind me of just how much the garden is giving. He tells me he places tomatoes in neighbors mailboxes up and down the street; that families in the community come to garden and pick lettuce, peppers or tomatoes. Rita a volunteer informs me that the salad bar at the mission has never looked so good. (I owe a huge thank you to Westurf Nursery, Rick Grey of Plant a Seed Foundation and Waterford Irrigation Supply Inc as well as many others!!)

We had the opportunity to have a local Girl Scout troop visit our garden and we took along children from the mission as well. It was a day of discovery for many kids, including one young girl who informed me this was he first trip off the mission without her parents. As we took the five minute walk from the Children’s Center holding hands I couldn’t help but feel prideful as people peered from their windows in a neighborhood that is constantly on the look out for what is wrong, and instead catching a glimpse of what is right.

On one field trip morning, I remember feeling particularly overwhelmed and disappointed; that the corn had all died, that weeds were overtaking our garden, and that there was a huge leak in our drip causing mud and more weeds to grow among the melons. As I took the kids to the garden that same day I was again reminded of of useless our doubts are.  The kids could have cared less about the weeds, or the dried up corn, instead they exclaimed over tomatoes, melons, and bravely tasted jalapenos. One boy asked with hope, “Can we come next week again, and bring cheese this time for the tomatoes!” The joy this boy had found here replaced any feelings of failure I had had just an hour ago. What a reminder that God requires of us not to be perfect, but to simply give what we can and look for the blessings in each small thing; and that all our anxieties need to be reexamined, surrendered to and handed over to something much greater than ourselves. Something that says its ok, and that is satisfied with the smile and thank you of a child.

In looking for a delicious and versatile way to use our tomatoes and jalapenos harvested on our last field trip with the Children’s Center, I thought of Salsa Con Queso. This one is dedicated to Angela who gives her heart and soul to her kids at the mission, who made an amazing salsa to share with the Children’s Center, (made from vegetables from the Gospel Garden), and and who loves cheese. I give you the best of both worlds. img_1652

img_1653

Salsa Con Queso

  • 6-10 Ripe Tomatoes (of any variety)
  • 5 Jalapenos (more or less depending on desire for heat) Cored
  • 3 Large Garlic Cloves
  • 1 Large White Onion
  • 3 Large Squash (yellow or zuchinni)
  • 1/2 Head Roasted Cauliflower (optional)
  • 3 Tbsp Butter
  • 3 Tbsp Flour
  • Salt and pepper to taste
  • 3 Cups shredded cheddar cheese or blend.
  • 1/2 C Greek Yogurt (see recipe for homemade)

Directions: Coarsely chop all vegetables. In heavy bottomed pot heat vegetables with salt until softened. Add butter, melt and then add flour. Simmer until easily pierced with fork. Use immersion blender to puree vegetables.

May use blender for smoother consistency, cool to room temp before blending. Add Cheese and yogurt. Stir until melted and incorporated. Serve and enjoy! Use as a dip for bread, crackers, or chips. Best served warm. Try on your favorite sandwiches, tacos or as pasta sauce tossed with olive oil.

A Simple Way to Make Cheddar Cheese and Your Own Cheese Press!

This as simple a way to make a  pressed cheddar cheese, I will also include illustrated instructions on how to make your own press!  You can create fresh cheddar curds without the use of a press. They taste good and are immediately gratifying. The aging and use of  press for hard cheeses makes the cheese special and creates a depth of flavors as time goes on. You can get creative and try different pressing and aging times, then sample the cheeses as time goes on. I did not get that far. I put my lovely pressed cheese to dry on the counter and the kids and I got too curious. We tried it and it was delicious, and gone before dinner. Either way it was fun to create and making cheese is such an art form. You can try to measure temperatures, time, weight, and ingredients just right but it really comes down to intuition and taking the time to know the process and sticking with it. Like any art.  Cheese making is a skill I am still learning and to me that is the fun of it. I’m going to outline through my experiences the easiest simplest and least fussy way to have a successful cheese. There are a whole lot of other recipes out there that go into more depth but I’m going to keep it as fun as possible, kids love this because it is a science experiment with yummy results!

img_9633

Ingredients:

Directions:

Put the milk in large clean stainless steel pot and slowly warm milk to around 80F, or just until milk feels on verge of getting hot. Sprinkle the culture into milk and stir well with whisk.

Cover and allow the milk to culture for around 45 minutes. I put this in the oven with light on and towel over top. Mix rennet in 1/4 C water and stir well into the milk. Cover and allow to sit another 45 minutes. It is now that a curd will begin to form. Using the blade of a long knife ( I use a cake frosting knife) you can literally cut into the curd. Make long cuts length wise and across to form 1/2 inch cubes. See picture.

Be gentle as the less you handle the more delicate your cheese will be. Let the now cut curds rest for 10 minutes. Then move pot to burner and heat to a little over 100 F for 40 minutes, stirring gently to keep curds form sticking together. Scoop out the curds with a strainer or slotted spoon into a colander. Allow the curds to rest in the colander and drain over the still warm pot. Let the curds drain for an hour, turning the curds to drain well and keep the whey below warm to allow the process of “cheddaring” to occur.

img_9622

It is now that the cheese will take on a squeaky texture, which the kids love to sample. Then remove the curds form the strainer and cut into 1/2 inch chunks. Put them in a bowl and toss with the salt. It may taste very salty but as the cheese is pressed, the salt comes out with the whey, so it is better to be a little heavy with the salt.

Creating a Cheese Press:

img_9632

Directions for Pressed Cheese:

Line the cheese mold with cheesecloth, I use a tea towel, and fill with the cut curds. Place on center of cheese press with pan to collect whey underneath. Place follower on top. I then put an empty mason jar which fits in lid. Place top wooden board and add 10 lbs weight for an hour. Take out cheese and cloth and turn over.


Replace weight and press an additional hour. Add 10 lbs and press overnight. Remove cheese and let air dry for 4 hours. You may eat fresh . Will last 2 weeks in refrigerator.  Age for flavor in cool dry place with wax for 4 weeks and   up to 6 months, even longer if desired!  The longer the cheddar ages, the sharper the cheddar becomes! Enjoy the process and let me know how your trails go!


Brown Butter Maple Oat Breakfast Muffins; Learn my Quick, One Pot “Blank Canvas”  Recipe, and a lemon version

img_9499
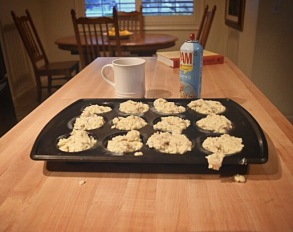
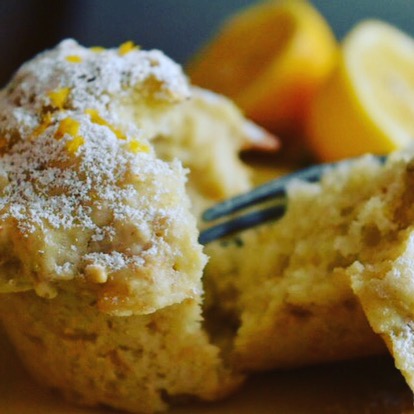
I’m bringing muffins back! Some of you may be thinking, I never knew muffins were out, neither did I! That was until I went to research muffin recipes in my new cook book and nada! Looking further online, it seems the culinary world has turned its back in this American staple. The muffin  is underrated and seen as creation that takes little skill that has now been confused with its trendier counterpart the cupcake. Muffins were created in America, different from the English version, this muffin was a batter that required a tin, and baking powder, which wasn’t invented until the late 1800’s. Muffins were traditionally made by hand, but modern bakeries wanting to make them more light like the much desired cupcake,  added more sugar and used a mixer to add dry to wet ingredients. Personally the muffin means a lot to me. It has been a wonderfully easy way yo be creative as a busy mom, and feed my kids a wholesome snack at the same time. Muffins are versatile and a great way to use seasonal fruits an vegetables. The possibilities are endless, and in using traditional methods with high quality  ingredients its like creating a work of art. It has taken me time to be able to not have to look at a recipe, creating a stand by muffin recipe that I can make quickly,  being able to get creative with what I have, and double easily to share. My recipe takes one pot, little mess and little time. I usually can make these in 10 minutes or less and you can too! Think of this recipe as a blank canvas. The ingredients should be the freshest you can find. If you can take the time to make fresh yogurt  I encourage it. See my recipe for homemade yogurt. Besides added health benefits, yogurt tenderizes baked goods. The homemade yogurt makes this muffin special, and creates a feeling of accomplishment. Get cookin’!

Ingredients

img_9515

Everything here except the Baking Soda and Powder

  • 3 C flour
  • 1 C Rolled Oats
  • 1 Tsp Baking Powder
  • 1 Tsp Baking Soda
  • 1 Tsp Salt
  • 3/4 C Sugar
  • 1/4 C Maple Syrup
  • 2 Eggs
  • 1 C yogurt
  • 1/2 C Butter (melted)
  • 1/2 – 1 C add ins- see below.

For Lemon Oat Muffins:

  • Juice and Zest of 2 Meyer Lemons
  • Powdered Sugar for dusting.

Other ideas for ad ins for both sweet and savory muffins include ; Apple sauce, Fruit puree or whole berries, chocolate chips, almond butter, roasted nuts, pureed vegetables like carrot or cauliflower, cheeses, grated zucchini, and the list goes on! You can adjust the add ins by decreasing the amount of yogurt or butter used. For example if you want to add 1 C apple sauce use only 1/2 C yogurt.

Have fun creating new muffins to try with your family. The portable nature of a muffin makes it such a great convenience and a way to pack nutrition into your day without hitting the drive thru, taking time and money. Remember these also freeze great for later use so stock up when you have some extra time to bake!

Directions;

In large pot melt butter. If making Lemon Muffins as pictured above, add lemon zest and juice. Let butter cool slightly. Add sugar, yogurt, maple syrup and oats, stir.

Place sifter over pot and sift in flour, salt, baking powder and soda.

Make a well in center of flour crack in 2 eggs. Using a fork beat the eggs until yoke and whites combined, then fold into dry and wet ingredients until just combined. Do not over mix, batter should be lumpy and this is OK. Spoon into buttered tins.

img_9508

You can never over fill and muffin tin!

bake 350 F for 15-20 minutes, or until tooth pick comes out clean. For Lemon Muffin sift tops with powdered sugar and additional lemon zest. Enjoy!


Split Pea Soup with Horseradish and Tarragon

img_9386
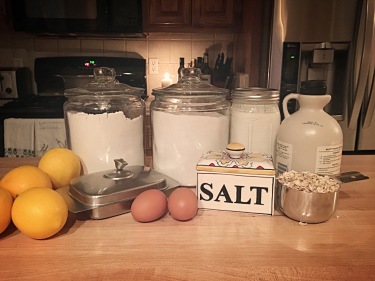
In the heart of everyone is a little country and a desire for simpler things. I don’t care where you are from or where you are now, this is true in all human beings. A soup like this is meant to be created and not ordered. This is as old school and traditional country as it gets. I spiced this up with fresh grated horseradish root and Verde sauce (courtesy of my mother and inspired by the taco Christmas eve shared with employees at dairy).  The spice cuts through the sweetness and richness of the ham and peas. I also brighten it with Meyer lemon and tarragon from our garden. Fresh garlic, onion, bay leaf and a little nutmeg add warmth. I did not have any carrot at the time, but if you have some add a couple large carrots chopped, as this is a great addition! I love this as a meal served with crusty bread and fresh butter.  Make an extra batch to share!

Yield: Approx 6 large servings                               Time: Preparation; 30 min. Cooking: 4 hours

Ingredients: img_9375

  • 2 1/2 C Split Peas Dried
  • 2 1/4 Quarts Water
  • 1 1/2  Lbs Cubed Ham plus Ham Bone
  • 1 Tbsp Chicken Bouillon
  • 2 Tsp Fresh Cracked Pepper
  • 2 Stalks Celery
  • 1/2 Medium Yellow Onion
  • 3 Cloves Garlic
  • 2 Tbsp Fresh Grated Horseradish Root
  • 1/2 C Verde Sauce
  • 1 Tsp Nutmeg
  • 2 Bay leaves
  • 1 Tbsp Dried Tarragon or 2 Sprigs Fresh Tarragon
  • 2 Tbsp Olive Oil
  • 1 Tbsp Meyer Lemon juice

Directions:

Melt butter in dutch oven or large stock pot. Add chopped onion, garlic and celery. Season with salt, pepper and nutmeg, and saute until transparent and softened. Grate fresh horseradish into vegetables. Add cubed ham and ham bone. Saute an additional 5 minutes to render flavor. Add Split peas, and cover with water. Add chicken bouillon and stir. Bring to boil an then turn heat to low. Cover and simmer for one hour.

Add bay leaf and tarragon, (I use something called a soup sock for herbs to be removed) and simmer an additional 3 hours, or until peas are cooked through and soup has thickened. Stir in Verde sauce and lemon. Garnish with additional fresh grated horseradish and serve with crusty bread and fresh butter! Enjoy this warm country meal and share with friends! May freeze for up to 4 months.

Dad, Uncle Jack, Aunt Angie and the kids at dairy Christmas Eve. Enjoying Oysters and fresh tacos with homemade Verde and guacamole prepared by the workers to share in celebration. A feast at the shop!


Hot Butter Rum Crepe Cake

img_9228Hot Butter Rum Crepe Cake! Crepe Cakes are a new discovery, and really is it necessary to make a cake out of crepes? Yes! We love our pancake mornings, and in deciding to try crepes  for the kids, I remembered an image of a crepe cake with it’s layers and layers of goodness. For the holidays a pastry creme with hot butter rum pair deliciously with these apple crepes! We used our Auntie Dana’s applesauce for the crepes and a little “pannenkoeken” or dutch pancake mix to add to tradition and meaning for our holiday!

This is a new adventure for me, as I have neither made pastry cream or crepes. The first img_9223cake was a disaster, as I used my own made up version of a crepe, which was more of a pancake and the layers were course and hard, not soft and light. So, in the second attempt, take my recommendation and stick to a traditional crepe recipe, yes they are more than just thin pancakes!  This really was simple to make, especially if you take it in steps, the longest part being making all the crepes.You need around 20 crepes to make the cake, and it goes fast once you get the hang of it!  You can  make the crepes well in advance and they will freeze beautifully until ready to be assembled. The pastry cream can be made a day or two before as well.

If you have not made pastry cream before, be ready for a bit of a science experiment! I’ll walk you through it with a few tips on what not to do, as learned! The kids and I really had fun watching the sudden formation of a solid from a liquid as the cream thickens.

Ingredients:

Crepes:img_9282

  • 5 Tbsp Butter
  • 1 1/2 C Flour
  • 1/2 C Pannenkoken ( if available, otherwise substitute with additional 1/2 C flour)
  • 3 C Milk
  • 1/2 C Applesauce
  • 6 eggs
  • 5 Tbsp Sugar
  • 1 Tsp Salt

Pastery Fillingimg_9281

  • 2 C Whole Milk
  • 2 Eggs
  • 2 Egg Yokes
  • 1/2 Tsp Salt
  • 1 C Sugar
  • 2 Tbsp “Hot Butter Rum Mix”
  • 1/4 C Corn Starch
  • 3 Tbsp Butter (Cold and Cut into pieces)
  • 1/4 C Whipping Cream
  • 3 Tbs Sugar

Directions:

Crepes: Mix Flours, salt and sugar in medium bowl. Melt butter. In mixer beat eggs and add  milk and applesauce, and then dry ingredients. Add melted butter and mix until just smooth. Allow to chill for at least 30 minutes or overnight. Heat medium non stick round pan over medium heat. Add approx 3 Tbsp of batter to pan and swirl to cover the entire bottom surface of pan. Wait 1-2 minutes and using hands gently flip crepe by grabbing edge. This may take a couple tries, but once you get it down will go fast! Place on plate and use paper towels or parchments sheets between each crepe so they do not stick together. When finished allow crepes to cool and then wrap in seran and place in refrigerator or freezer until ready to assemble and up to 2 months.

Filling: Heat milk and Hot butter rum mix  in saucepan until very hot but not scalded. Beat eggs, egg yokes and salt at medium speed until thickened, add sugar 2 tbsp at a time until thickened and pale. On low speed beat in cornstarch until smooth, then add milk a spoonful at a time as to not “cook” the eggs. Then pour mixture back into sauce pan that was used to heat the milk and add cold butter pieces. Cook over medium heat with constant stirring using a spatula, scraping across sides and bottom. It will begin to form thick lumps on the bottom, continue scraping (this is the science experiment part!) Once mixture is fully “lumpy” switch to whisk and whisk for 5 to 7  minutes until mixture is smooth. Pour into bowl. In chilled bowl (helps cream thicken faster) of mixer beat whipping cream and sugar on high until thick peaks form. Fold into pastry cream. Place plastic wrap down into bowl touching the surface of mixture. This will keep any “skin” from forming.


When ready to assemble cake lay a crepe down on desired serving dish and add 1/4 C pastry creme mixture, then layer with remaining crepes and repeat layers. Top with extra whipped cream and sprinkle with cinnamon and powdered sugar. Enjoy!


Festive Persimmon and Pomegranate Cookies


These persimmon and pomegranate cookies are for when you really want to share something special during the holidays. So many people I shared these with  had fond  memories or persimmon cookies during the holidays. This cookie surprises as it has a little twist. I use persimmon and pomegranate . I use my Christmas Jam in these, and this recipe is a snap if you already have the jam on hand. See my recipe and make extra for gifts to go along with these cookies. Persimmons and Pomegranates are two very special ingredients, that is very expensive at the stores, but I was lucky enough to have a neighbor with an ancient Pom tree as well as a long-standing persimmon tree up in knights ferry. Make your holiday extra special by making these cookies! The cookies freeze nicely, and kids love them as well! Glad I wrote down the ingredients when creating this recipe, and hope you will enjoy!

Yield: Approx 20 Large Cookies                                             Time: 45 Minutes

img_8865

Ingredients:

  • 1 C Butter
  • 1 1/2 C Sugar
  • 1/2 C Brown Sugar
  • 2 Tbsp Yogurt ( Try my Recipe to make your own!)
  • 1 1/2 C Christmas Jam
  • 1 Tbsp Vanilla
  • 2 Eggs
  • 4 C Flour
  • 2 Tsp Salt
  • 2 Tsp Baking Soda
  • 2 Tsp Baking Powder
  • 3 Tsp Cinnamon
  • 3 Tsp Nutmeg

Directions: 

Preheat oven to 375 F. Sift Dry ingredients into bowl and set aside. In bowl of mixer add butter and sugars, cream on high until light and fluffy. Add  jam and yogurt, mix until smooth.  Adding one egg at a time, beat at  low speed until just incorporated.

img_8864

Hint: Batter can be clumpy, its best to not over mix eggs, they will mix once dry ingredients are added.

Slowly add dry ingredients, taking time to stopping to  scrape sides, adding 1/3 of dry mixture at a time until just blended together. Drop large rounded spoonfuls onto parchment paper 1 1/2″ apart. Bake for approx 12 minutes. Do not over cook, cookies are done when edges appear golden brown. Remove from oven and sprinkle with cinnamon sugar if desired. Happy Holidays!

img_8569


Christmas Jam; Persimmon and Pomegranate

This is a recipe that if you are fortunate to receive or have large amounts of this special produce should be made with care and given with love. It is literally so good you can eat this by the spoonfuls! It has just the right amount of sweetness.  I don’t even like Persimmons, or so I thought. This will be used in many recipes from a cheese cake to a turkey glaze, so stay tuned, and get creative using this in your own recipes!  This was truly a blessing and joy to make. Our Meyer lemon tree is almost ripe, and the juice in the lemons worked well to bring some tartness to the super sweet persimmons. We picked the persimmons from a ranch in Knights Ferry that my aunt so graciously lets us visit anytime. The persimmon tree has been there for ages and is a sight to behold as you wind your way down to the valley on the ranch. The boys helped pick a bunch. We eagerly tasted one, big mistake. Not quite ripe,  I liken it to eating a bitter cotton ball!  The persimmons set out a week they became mushy soft, which is what you want for this variety, also known as Hichiya,  before you try to eat or bake. They were super sweet in a delicate way. Little did we know we came upon a fortune, as at the grocery store persimmons were going for 2$ each! My sweet neighbor, Barbra, brought us a large bag of pomegranates from her beautiful tree, these are the best I have ever had. Store bought does not compare, I can barely taste the seeds in these there is so much fruit inside. I thought combining these two seasonal fruits into a Jam that will serve as a gift and an ingredient in holiday baking would be festive and appreciated!

Ingredients:

(You can triple this recipe to give as gifts for Christmas)

  • 1 C Persimmon Puree (6 large persimmons)img_8703
  • 1/3 C Sugar (or to taste, depending on how sweet fruit is, can also be left out)
  • 2 Tbsp Water
  • 1 Tbsp Corn Starch
  • 2 Tbsp Lemon Fresh Lemon Juice
  • 1/2 C Fresh Pomegranate Juice


Directions:

Peel persimmons into blender. I find it easiest to use my hands and kind of mulch out the innards.  Seed the pomegranates by cutting in half and using a large wooden spoon to whack until seeds fall into bowl.

Will seem messy at first but once you get the hang of this it will go fast. Make extra and freeze the juice for later or for drinking.  Puree Persimmons until smooth. Using juicer juicepomegranate  seeds to extract juice. (Or use store bought!)  Place puree in sauce pan, add sugar and pomegranate juice over medium  heat until incorporated. Add water and corn starch in separate bowl and whisk until dissolved. Whisk into puree. Add lemon juice. Boil on low until thickened, approx 15 minutes. Let jam cool to room temperature and pour into sterilized jars. Can if desired, or store in refrigerator.  Enjoy and share the love!

Harvest Short Ribs; Braised in Brown Butter and Tarragon on Bed of Creamy Yogurt Polenta

img_8608Tried to sound fancy; got you didn’t I?? This is simple as food gets, but we can make it sound pretty elevated. This is “peasant food,” which by the way is the kind of food I love to eat and cook. It is about using what you have, making the most of it. When cooking my recipes, have fun be creative. Don’t have nutmeg? Don’t drive to the store, use something you may have, cloves or coffee can warm up this dish with flavor just as well, then it will be truly your creation.

img_8110

The short rib is by no means a fancy cut, but when cooked right it is buttery melt in your mouth divine. I used the last of our garden vegetables as I prep our garden beds for a fall garden. I roughly chopped up the vegetables, letting them cook down through out the day, and then puree in a blender. I plan to use the other half for a vegetable based soup. The ribs are braised with tarragon,  butter and coconut oil, then allowed to stew with the sauce until tender. The coconut oil allows the butter to get to a high temperature without burning. I serve this over polenta. My mother and grandmother always had polenta, I was shocked at how little other people use this Italian staple!  I like my polenta creamy, but not watery, similar to a thick “grits,” with the grain of polenta is finer. I stir in my yogurt made fresh from the dairy farm to give the polenta extra creamy.  If you haven’t tried to make your own yogurt try it using my method! This is a perfect meal for a cold fall night. Make extra and invite friends!

Ingredients:

  • 4-8 Qts vegetable puree. (A full 8 Qt Pot of chopped vegetables)
  • 4- 6 lbs Short Ribs
  • 2 Tbsp Fresh Chopped Tarragon
  • 2 Tbsp Butter
  • 2 Tbsp Coconut Oil
  • 1/4 C wine
  • Salt and Pepper to Taste
  • 1 tbsp ground nutmeg
  • 1/3 C molasses
  • 1/3 C balsamic vinegar
  • 1/3 C sugar

Polenta:

  • 1 1/2 C Corn Meal
  • 6 Cups of Chicken Stock
  • 2 Tbsp Butter
  • 2 Tbsp Yogurt
  • Parmesan Cheese

Directions: Roughly chop what vegetables you have on hand (carrots, celery, onion, kale, garlic, eggplant, zucchini etc) Add olive oil, salt and pepper and cook until all vegetables are tender. Puree in blender or with immersion blender in pot.

In separate pan, brown short ribs. I will explain the method of braising; start by heating the butter and coconut oil in saute pan. Season short ribs with salt and pepper. Chop tarragon and add to pan. Pace ribs in pan and let brown on one side, then flip. Approx. 3 minutes a side at very high heat. Make sure you get a nice “crust,” this will allow the ribs to seal in any juices and lead to tastier meat. Now you will have some burnt looking bits, this is the fat that has been rendered and is full of flavor. Add a little liquid of your choice, wine, water or chicken stock. About 1/4 cup. Using spatula scrape these bits with the liquid and let it reduce a bit. Add ribs and browning liquid to vegetable puree.

Add molasses, nutmeg, sugar and vinegar. Simmer on low heat for 1 hour. Place in 350 F oven for 2-4 hours. Make polenta by boiling chicken stock and butter. Add Polenta slowly with whisk to avoid lumping. remove from heat and let sit for 30 minutes stirring occasionally. Serve short ribs over polenta with extra juice and a little parmesan if desired! Enjoy.

img_8602

Because if I ever become a mother who keeps their family from eating to get a good picture, please tell me to stop


Lavender Rosemary Freezer Cookies


img_8449These Lavender Rosemary Freezer Cookies are not like eating soap, promise. My children can testify! This is a classic butter cookie recipe with simple ingredients, made special by adding a little fresh lavender and rosemary from our garden. I use my home made yogurt fresh from the dairy- store bought regular or greek yogurt is fine! This is my new go too butter cookie recipe, perfect for up coming holiday. You can get creative and add your own spin; maybe mint, lemon or almond? A little pumpkin and maple for fall? Experiment and enjoy. I tried to put detailed instructions for a no fail cookie!

img_8445

Ingredients:

  • 2 Sticks Butter (at room temperature)
  • 1 1/2 C Sugar
  • 1 Tbsp Yogurt 
  • 2 Eggs (at room temperature)
  • 2 Tsp Vanilla
  • 4 C Flour ( sifted)
  • 3 Tsp Salt
  • 2 Tbsp Minced Rosemary
  • 1 Tbsp Minced Lavender Flowers
  • Directions:

In large bowl (not the mixing stand bowl) sift flour. Stir in salt, rosemary and lavender.

In mixing bowl cream butter and sugar at high-speed until light and airy, (see pictured).

img_8444

Beat in 1 egg as a time on low, add vanilla. Add 1/4 dry mixture and mix on medium, stop, scrape sides, and repeat for remaining dry ingredients. Do not over mix; (leads to tougher cookie). Chill 30 minutes. Place 1/3 chilled mixture on parchment paper and roll into log.

Place in bag or cover in plastic wrap. Repeat with remaining dough. Store in freezer for up to 4 months. Thaw a little before using (approx 10 minutes), then slice in 1/4″ rounds and bake on parchment lined baking sheet for 10 -15 minutes at 350 F. Enjoy your beautiful cookies, they make a great gift in special tin as well!

img_8441

Lilly’s favorite part!